
Slackware
Established back in 1993, Slackware (The Slackware Linux Project; Wikipedia) is the oldest surviving Linux distribution...
Slackware Linux 3.0 was the first Slackware release to have an official CD-ROM distribution and support installation from CD-ROM. Released in November 1995, the same month as the Pentium Pro. So complete system support is limited to i386, i486 and early Pentium systems.
Fortunately I have a Pentium based system that consists of hardware from this era: tilia. And that machine can be approximated using an Intel 430fx based system in PC emulators such as PCem.
PCem
The IBM PC and compatibles emulator PCem supports a range of PC system, from the original Intel 8088 based IBM PC through to a early 2000s slot 1 based Pentium II system. This includes a couple of systems featuring the Intel 430fx chipset which makes them equivalent to our physical system.
So the target emulated hardware is:
| Mainboard | Intel Advanced/ZP (Zappa); Intel Triton 82430FX PCIset aka. 430FX |
|---|---|
| CPU | Intel Pentium 75 |
| RAM | 72 MiB (128 MiB max.) |
| Floppy | 3.5" 2.88MB |
| Storage | IDE Controller Intel 82371FB aka. PIIX, ATA-2 16 MB/s |
| IDE hard disk 2048 GB | |
| ATAPI CD-ROM drive | |
| Video | S3 Trio64 based VGA |
| Network | 10Mb/s ethernet ISA |
PCem Installation
For simplicity of installation I'm using a PCem distribution that bundles a collection of firmware ROMs for the various systems supported by PCem.
For this case I'm using the Windows installer for PCem v17.0 (PCem_Setup.exe).
Alternatively you could use the official distribution from the PCem website and source the required firmware ROMs separately.
Note that if using a Linux installation you need to run pcem and then exit, so the user configuration directory ~/.pcem/ is generated. Then copy the collection of firmware ROMs into the ~/.pcem/roms/ directory. Depending on the source of the firmware ROMs you may need to adjust the case of the filenames so PCem picks them up correctly (see the listing in README.md).
PCem System Configuration
Now that PCem is installed, a machine configuration is required to specify the details of the machine to emulate. Fortunately PCem provides a menu based interface for doing this.
- Start PCem
- The initial window shows a list of the available machine configurations (most likely empty at this point), and a set of buttons for managing the configurations.
- Create a machine using the bottom left icon ("New") and give the machine a name (e.g. "Slackware 3 i430fx Pentium 75")
- After a short pause the machine configuration dialog should now open. If it doesn't select the new machine from the list and use the tools icon on the right ("Configure") to access the configuration dialog
- Working through the configuration tabs in order:
- Mainboard, processor and memory
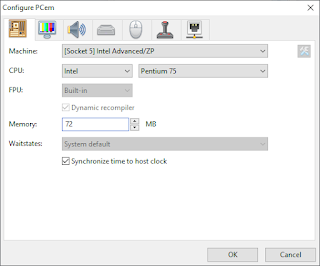
- "Machine": we select a i430fx based board, which are currently "[Socket 5] Intel Advanced/ZP" or "[Socket 5] Itautec Infoway Multimidia".
- "CPU": we want an Intel Pentium 75, which happens to be the default.
- "FPU": disabled since the main processor provides an FPU.
- "Memory": in order to match the physical machine this is set to 72, rather than the default and maximum value of 128.
- "Waitstates": the default looks good
- Display

- "Device": for S3 Trio64 cards we have two choices: "Number Nine 9FX (S3 Trio64)" and "Phoenix S3 Trio64". FWIW I've had the best experience with the Number Nine card.
- "Speed": the default looks good
- Audio: for the moment we're not interested in audio, so the default settings are good.

- Drives
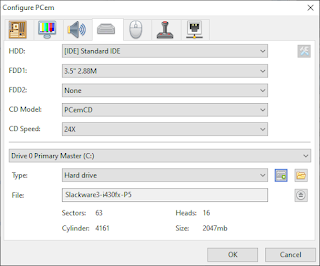
- "HDD": the default "[IDE] Standard IDE" is good.
- "FDD1": set this to '3.5" 2.88M'
- "FDD2": set this to 'None'
- "CD Model": the default "PCemCD" is good.
- "CD Speed": the default "24x" is good.
- For "Drive 0 Primary Master (C:)" create a hard disk of 2048 MB using the "New" button.

- Mouse
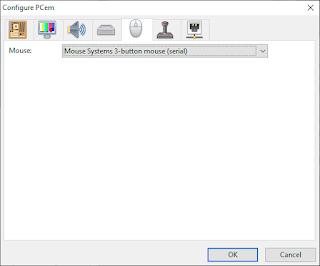
- "Mouse": select "Mouse Systems 3-button (serial)" since we'll be running X Windows and will want the middle button.
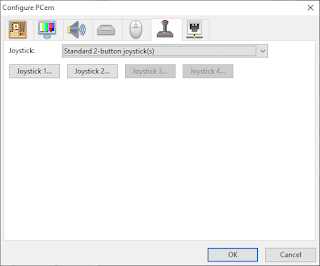
- Joystick: not likely to use this, so the default settings are good.
- Network

- "Network Card": select "NE2000" to have basic ethernet
- Mainboard, processor and memory
- Click the "OK" button to save the configuration and close the dialog.


So now we have a machine to install Slackware on...
Slackware Installation
- Fetch the Slackware Linux 3.0 CD-ROM image from Archive.org (https://archive.org/details/Slackware_Linux_3.0_Walnut_Creek_October_1995), for installation we only need CD 1.
- Sadly the CD is not bootable (the El Torito CD-ROM specification was released in 1995), so we need to use floppy boot images. We need a boot and a root image.
- For the emulated machine the 'idecd' and 'color.gz' floppy images are what we are looking for to get IDE CD-ROM support and nice menus for installation.
- On MS Windows:
- In file explorer, find the downloaded ISO and double-click to mount the disk image
- Copy the boot disk image (\BOOTDSKS.144\IDECD) to a working directory
- The boot image needs to be padded to 1.44MB and renamed to have the ".img" extension so PCem treats it as a raw disk image. In my case I'm using an image I padded on Linux.
- Copy the root disk image (\ROOTDSKS\COLOR.GZ) to a working directory
- The root image also needs to be renamed to have the ".img" extension.
- Once done with the ISO, be sure to "Eject" the image
- On Linux:
mkdir tmp_mnt
fuseiso slackware3_cd1.iso tmp_mnt # Mount the ISO
cp tmp_mnt/bootdsks.144/idecd ./  # Boot disk (only 600KB)
truncate -s 1440K idecd           # Pad boot disk to 1.44MB
cp tmp_mnt/rootdsks/color.gz ./   # Root disk (already 1.44MB)
guestunmount tmp_mnt/             # Unmount the ISO
rmdir tmp_mnt
- Now the boot and root floppies are prepared, back to PCem...
- Start/load the machine we created
- Use the "Disc">"Change drive A:..." menu to insert the boot disk image (IDECD.img)
- Use the "CD-ROM">"Image..." menu to insert the Slackware CD-ROM ISO
- When first booted the machine will stop for the BIOS settings to be confirmed. Most of the settings will be fine, but the BIOS needs to be told about the floppy drive being 2.88MB.
- Using the normal floppy swapping with at the LILO boot prompt use "ramdisk mem=72m"
- Swap the floppy image to COLOR.GZ.img, using "Disc">"Change drive A:..." menu when requested.
- The hard drive is blank, so once we've logged in as "root", we need to partition the disk: fdisk /dev/hda
- Use 'm' to familiarize yourself with the options.
- Since we have plenty of memory we could skip having a swap partition. But a small swap space can help so I will create one.
- New 'n', primary partition 'p', partition '1', from cylinder '1' to '504'
- New 'n', primary partition 'p', partition '2', from cylinder '505' to '520' (at ~4 MB per cylinder, 16 cylinders is about 64 MB).
- Type 't', partition '2', type list 'L', type '82' (Linux swap).
- Write changes to disk 'w'
- With the disk partitioned, run setup to continue the installation and follow the prompts...
- If your plan to use the manual pages (man) be sure to install GNU troff (gtroff) from the 'AP' set
- The graphics card works with the S3 XFree86 server
- The mouse is a "Mouse Systems 3-button Serial"
- For user networking the IP addresses are (from PCem forum):
- Host: 10.0.2.16
- Gateway: 10.0.2.2
- Netmask: 255.255.255.0
- DNS: 10.0.2.3
- In order to use all of the configured RAM the memory size has to be passed as a kernel parameter by LILO, otherwise it will only see 64 MiB (the maximum the BIOS reports). For this machine we use "mem=72M" as the kernel parameter.
- The IRQ for the NE2000 card isn't recognized by default, so force the configuration with the kernel parameter: ether=10,0x300,0,0,eth0
- Once logged in:
- give 'root' a password (passwd)
- add a regular user account (adduser)
- configure the X server (xf86config). When configuring the X server, assume the monitor is the most capable option each time. The emulated card is a S3 Trio64 VGA PCI with 2MB RAM, so I used the "S3-Trio64 generic" option which works fine.
- If the configured name server doesn't work. Try adding the your network DNS address to /etc/resolv.conf as another nameserver
With the system installed further exploration will involve hitting the documentation:
- Installed docs:
- FAQs and HOWTOs: /usr/doc/faq/
- Manual pages: apropos <term>, man -k <term>, man <pagename>
- GNU info: info
- CD-ROM: docs/
- The Linux Documentation Project
- Various Linux usenet groups, such as:
System Information - Slackware Linux 3.0
So what does Slackware Linux 3.0 have to say about the system...
uname
Operating system release information:
$ uname -a
Linux p-slack3 1.2.13 #1 Wed Aug 23 01:06:43 CDT 1995 i586
A "Linux" kernel, on a node named "p-slack3", kernel release "1.2.13", version "#1 Wed Aug 23 01:06:43 CDT 1995", on a "i586" machine.
/proc/cpuinfo
Processor information:
$ cat /proc/cpuinfo
cpu		: 586
model		: Pentium 90/100
mask		: D
vid		: GenuineIntel
fdiv_bug	: no
math		: yes
hlt		: yes
wp		: yes
Integrated NPU	: yes
Enhanced VM86	: yes
IO Breakpoints	: no
4MB Pages	: yes
TS Counters	: yes
Pentium MSR	: yes
Mach. Ch. Exep.	: no
CMPXCHGB8B	: yes
BogoMips	: 74.98
That would be a second generation Intel Pentium processor (P54C), but the BogoMips looks too high. The configuration has the CPU at 75MHz, which normally gives a BogoMips result of around 30...
The CPUID (Wikipedia) for this processor should be: family 5, model 2, with any stepping. The "mask" here is the stepping rendered as an ASCII letter (in 'fs/proc/array.c' we have mask[0] = x86_mask+'@';) which makes 'D' a stepping of 4.
/proc/meminfo
Memory information:
$ cat /proc/meminfo
        total:   used:    free:   shared:  buffers:
Mem:  73711616 41402368 32309248  6053888 35647488
Swap: 66056192        0 66056192
So 72 MiB RAM, with 64 MB of swap.
/proc/pci
Report PCI devices:
$ cat /proc/pci
PCI devices found :
Bus  0 Device   0 Function  0.
    Host bridge : Intel 82437FX Triton (rev 0).
Bus  0 Device   7 Function  0.
    ISA bridge : Intel 82371FB (rev 0).
Bus  0 Device  13 Function  0.
    VGA display controller : S3 Inc. Trio32/Trio64 (rev 0). 8259's interrupt 11.
The Linux 1.2 kernel used in Slackware 3.0 pre-dates the availability of the lspci command or the /proc/bus/pci/devices file. So we're left with /proc/pci. Since the network card is on the ISA bus, we only see the mainboard chipset and the graphics card.
dmesg
System log:
$ dmesg
Console: colour EGA+ 80x25, 1 virtual console (max 63)
bios32_init : BIOS32 Service Directory structure at 0x000fc9f0
bios32_init : BIOS32 Service Directory entry at 0xfca00
pcibios_init : PCI BIOS revision 2.10 entry at 0xfca21
Probing PCI hardware.
Calibrating delay loop.. ok - 74.98 BogoMips
Serial driver version 4.11 with no serial options enabled
tty00 at 0x03f8 (irq = 4) is a 16550A
tty01 at 0x02f8 (irq = 3) is a 16550A
lp0 at 0x03bc, using polling driver
ftape: allocated 3 buffers aligned at: 00238000
hda: PCemHD, 2047MB w/256KB Cache, LBA, CHS=520/128/63, MaxMult=16
hdc: PCemCD, ATAPI, CDROM drive
ide1: secondary interface on irq 15
ide0: primary interface on irq 14
Floppy drive(s): fd0 is 2.88M
FDC 0 is a post-1991 82077
lance.c: PCI bios is present, checking for devices...
Memory: 71988k/73728k available (760k kernel code, 384k reserved, 596k data)
This processor honours the WP bit even when in supervisor mode. Good.
Swansea University Computer Society NET3.019
Swansea University Computer Society TCP/IP for NET3.019
IP Protocols: ICMP, UDP, TCP
PPP: version 0.2.7 (4 channels) NEW_TTY_DRIVERS OPTIMIZE_FLAGS
TCP compression code copyright 1989 Regents of the University of California
PPP line discipline registered.
SLIP: version 0.8.3-NET3.019-NEWTTY (4 channels) (6 bit encapsulation enabled)
CSLIP: code copyright 1989 Regents of the University of California
NE*000 ethercard probe at 0x300: ac de 48 88 bb aa
eth0: NE2000 found at 0x300, using IRQ 10.
ne.c:v1.10 9/23/94 Donald Becker (becker@cesdis.gsfc.nasa.gov)
Checking 386/387 coupling... Ok, fpu using old IRQ13 error reporting
Checking 'hlt' instruction... Ok.
Linux version 1.2.13 (root@bigkitty) (gcc version 2.7.0) #1 Wed Aug 23 01:06:43 CDT 1995
Partition check:
  hda: multiple mode turned off
  hda: hda1 hda2
VFS: Mounted root (ext2 filesystem) readonly.
Adding Swap: 64508k swap-space
Max size:331555   Log zone size:2048
First datazone:68   Root inode number 139264
ISO9660 Extensions: RRIP_1991A
VFS: Disk change detected on device 2/0
Here we see the results of hardware detection, the NE2000 card is picked up correctly due to the 'ether' kernel parameter being passed to force the IRQ.
Further Sources
- Pentium (original) - Wikipedia
- 242480-002_Pentium_Processor_Specification_Update_Mar95.pdf - Intel Pentium Processor Specification Update. Release Date: March, 1995
No comments:
Post a Comment